Posts

Showing posts from 2010

NETSH Command to Change from Static IP Address to DHCP

To switch the specified adapter from a static address to DHCP, type the following command: netsh interface ip set address "Local Area Connection" dhcp NOTE: Typing this command changes the interface named "Local Area Connection" to DHCP. To display all of the adapters in the computer with their current IP addresses to determine the correct adapter name, type the following command: Netsh interface ip show config To change to a static address, type the following command: netsh interface ip set address "Local Area Connection" static ipaddr subnetmask gateway metric NOTE: Replace ipaddr with the static IP address, subnetmask with the subnet mask, gateway with the default gateway and, if necessary, metric with the appropriate metric. The following example changes the interface "Local Area Connection" to a static address of 192.168.0.10 with a subnet mask of 255.255.255.0, and the interface has a default gateway of 192.168.0.1 with a metric of

Unsupported Cluster Configuration error in SCVMM 2008 R2

I was troubleshooting to fix above error and below article helped me to fix it easily:) http://blogs.technet.com/b/scvmm/archive/2010/05/10/understanding-network-location-and-tags-in-scvmm.aspx

Hidden Network adapter in Device manager

To resolve this problem, uninstall the ghosted network adapter from the registry using one of the following methods: Back to the top Method 1 Click Start, click Run, type cmd.exe, and then press ENTER. Type set devmgr_show_nonpresent_devices=1, and then press ENTER. Type Start DEVMGMT.MSC, and then press ENTER. Click View, and then click Show Hidden Devices. Expand the Network Adapters tree. Right-click the dimmed network adapter, and then click Uninstall. Back to the top Method 2 The DevCon utility is a command-line utility that acts as an alternative to Device Manager. When you use DevCon, you can enable, disable, restart, update, remove, and query individual devices or groups of devices. To use DevCon, follow these steps: Download the DevCon tool by clicking the following article number to view the article in the Microsoft Knowledge Base: 311272 (http://support.microsoft.com/kb/311272/ ) The DevCon command-line utility functions as an alternative to Device Manager Unp

How to slipstream Service Pack 3 into Microsoft Office Project 2003

How to slipstream Service Pack 3 into Microsoft Office Project 2003 These instructions apply to Project 2003 Standard Edition. To slipstream other versions, you’ll need to replace PRJSTDE.MSI with the name of the MSI for your Project Edition. Steps You’ll need a Volume Licence Key setup CD. D:\setup.exe /aSave to C:\project2003\ Download Project 2003 SP3 Extract its contents to C:\Project2003SP3\ with: Project2003SP3-KB923622-FullFile-ENU.exe /Q /C /T:C:\Project2003SP3\Perform slipstream with: msiexec /p C:\Project2003SP3\PROJECTSP3.msp /a C:\Project2003\PRJSTDE.MSI SHORTFILENAMES=TRUE /qbDelete the C:\Project2003SP3\ folder as you no longer need it

Patching an administrative installation point

Patching an administrative installation point You must install administrative updates (MSP files) from the command line. On the command line, you run Windows Installer with options to specify the path to the MSI file and the name and path of the MSP file. The MSI file is the Windows Installer package file from your original administrative image. The MSP file is the Office administrative update file that contains information about the changes in the upgrade. The update instructs Windows Installer to add, update, or remove files in the administrative image. -------------------------------------------------------------------------------- Note Before you update an administrative installation point, make sure that no clients are using the share. If a file on the share is in use during the upgrade process, a newer version of that file is not copied to the administrative installation point. -------------------------------------------------------------------------------- To apply an update

Office System (2003) SP3 Slipstreaming

Office System (2003) SP3 Slipstreaming by Daniel Petri - January 8, 2009 Printer Friendly Version How can I slipstream service packs into Office System (2003)? Like in previous versions of Office and their corresponding Service Packs, SP3 can be slipstreamed into an administrative installation point of Office 2003, in order to allow for a fully integrated installation. This scenario explains how to create an integrated installation of Office System (2003) and the corresponding service pack in a shared distribution folder on a network or on your local computer. To complete this procedure, you must have the original Office 2003 CD media. Note: This explanation is based upon usage of Office System (2003) and SP3, but will also work for any future service packs. For Office XP integrated installations see "Office XP SP1/2/3 Slipstreaming". Prerequisites for slipstreaming Before we begin anything, you'll need to have a few things: 1.Office System (2003) CD 2.You will need the A

Managing Message Tracking

Managing Message Tracking Applies to: Exchange Server 2007 SP3, Exchange Server 2007 SP2, Exchange Server 2007 SP1, Exchange Server 2007 Topic Last Modified: 2009-06-03 A message tracking log is a detailed log of all message activity as messages are transferred to and from a computer that is running Microsoft Exchange Server 2007 and that has the Hub Transport server role, the Mailbox server role, or the Edge Transport server role installed. Exchange servers that have the Client Access server role or Unified Messaging server role installed don't have message tracking logs. You use message tracking logs for message forensics, mail flow analysis, reporting, and troubleshooting. You can use the Set-TransportServer cmdlet for all message tracking configuration tasks on a Hub Transport server or Edge Transport server. You can use the Set-MailboxServer cmdlet for all message tracking configuration tasks on a Mailbox server. For servers that have the Hub Transport server role and the

Command to get Dell Service tag [wmic]

wmic bios get serialnumber From remote C:\wmic /user:administrator /node:"remote-host" bios get serialnumber SerialNumber ABCDEF1 [Note: Replace remote-host with the machine name of your remote-host.]

Using icacls.exe command line utility to set NTFS permissions on folders and files

Below is the syntax for: Simple example: icacls C:\Windows /grant Administrator :F Will grant the user Administrator Full permission to C:\Windows folder Advanced example: icacls C:\Windows /grant Administrator :(OI) (CI)F /T /C Will grant the user Administrator Full permission to C:\Windows folder and subfolders and files, operation will continue on all file errors and set inheritance flag as Object interitance, Container inheritance inheritance rights may precede either form and are applied only to directories: (OI) - object inherit (CI) - container inherit (IO) - inherit only (NP) - don't propagate inherit /T indicates that this operation is performed on all matching files/directories below the directories specified in the name. /C indicates that this operation will continue on all file errors. Error messages will still be displayed.

Changing the default scripting engine from Wscript to Cscript

Change the default scripting engine from Wscript to Cscript. (The Xcacls.vbs script works best in Cscript.) To do this, type the following at a command prompt, and then press ENTER: cscript.exe /h:cscript Note Changing the default scripting engine to Cscript only affects how scripts write to the screen. Wscript writes each line individually to an OK dialog box. Cscript writes each line to the command window.

Backup and Restore DNS zones

With DNS, backing up primary and secondary zones independent of the system state is a pretty simple process. You can use the xcopy command to back up all zone text files on a DNS server. This command would back up the contents of the default DNS folder to the "D:\backups\dns" folder: xcopy %systemroot%\system32\dns d:\backups\dns /y Unfortunately, the process isn’t as simple for Active Directory-integrated DNS zones. For these zones, the support tool dnscmd.exe can get the job done. To back up any DNS zone with dnscmd.exe, you just need to use the /zoneexport switch with the command. To back up the MCPmag.com zone locally on a DNS server, you'd run: dnscmd /zoneexport mcpmag.com backup\mcpmag.com.dns.bak This command writes a copy of the mcpmag.com zone to the %systemroot%\system32\dns\backup\mcpmag.com.dns.bak file. Note that the command doesn't overwrite existing files, so if you’re including it with a backup script, be sure to move the file to an alternate lo

ConfigMgr components

Image
Below are the components of ConfigMgr: Out of Band Management Management Point Component Software Distribution Software Update Point Component Status Reporting System Health Validator Point Component

Enable Ping Replies from your Windows 2008 Server Server

Enable ICMP Replies via the local Command Prompt On your Server Core machine, at a command prompt, type the following: netsh firewall set icmpsetting 8 This will allow you to ping the Server Core server from a remote machine, and receive a reply. You can always run the following command in order to disable this option: netsh firewall set icmpsetting 8 disable

Soft reset Dell DRAC through SSH

Open Putty.exe Enter Hostname or IP address, port number leave as default (22). Open You will be connected to CLI of DRAC Issue the below command: racadm racreset Above command will perform soft reset of DRAC.

Logon scripts FAQ

Frequently Asked Questions About Logon Scripts:   1.How do I setup Logon scripts in a domain with Active Directory?   2.Why would I choose one method over another?   3.Can I use both methods to assign Logon scripts?   4.How do I setup Logon scripts so they support all of my clients?   5.How do I configure a Logon script for a user on the "Profile" tab in AD Users & Computers?   6.What languages can I use for Logon scripts?   7.Can I use a VBScript program for a Logon script on all clients in my domain?   8.How do I configure a Logon script with Group Policy?   9.What about Logoff, Startup, and Shutdown scripts in Group Policy?   10.What permissions are required for Logon scripts to run?   11.What can be done with a batch file Logon script, besides launch a VBScript program?   12.What about Logon scripts in an NT domain? Answers:  1. How do I setup Logon scripts in a domain with Active Directory?   There are two ways to assign Logon scripts. First, you can specify the Logo

ipsec service cannot start error: "cannot find the file specified"

In Windows 2003 Citrix server, ipsec service cannot start error: "cannot find the file specified" Resolution: To resolve this issue, follow these steps: Delete the local policy registry subkey. To do this, follow these steps: Click Start , click Run , type regedit in the Open box, and then click OK . In Registry Editor, locate and then click the following subkey: HKEY_LOCAL_MACHINE\SOFTWARE\Policies\Microsoft\Windows\IPSec\Policy\Local On the Edit menu, click Delete . Click Yes to confirm that you want to delete the subkey. Quit Registry Editor Rebuild a new local policy store. To do this, Click Start , click Run , type regsvr32 polstore.dll in the Open box, and then click OK . Verify that the IPSEC Services component is set to automatic, and then restart the server.

IE Enhanced Security Configuration

Image
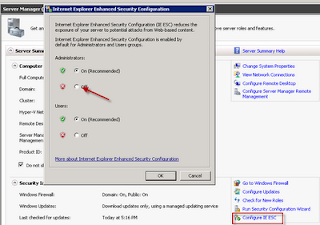
Here is how to disable IE Enhanced Security Configuration in Windows 2008 server: Open Server manager Navigate to configure IE ESC Set "off" for Administrators.

Shortcut for Elevated Command Prompt (Windows 2008,7,Vista)

Here is the easiest way to open elevated command prompt: Click on the "Start" button In the "Start Search" box type the name of the program you want to run as administrator. For example type CMD or CMD.EXE. Do NOT hit ENTER. Instead hit CTRL+SHIFT+ENTER. It seems that this key combo triggers user account elevation and is identical to the RUNAS command or the GUI "Run as administrator" option. You will be prompted by the UAC warning window. Click on CTRL+C or click on the "Continue" button. Note that the CMD window has an "Administrator:" appended to the window title. You can now perform any administrative tasks you want. Reference:http://www.petri.co.il/quickly_open_cmd_with_elevated_credentials_in_windows_vista.htm

Remote Desktop Connection Manager v2.2

Image
Remote Desktop Connection Manager is very good freeware tool for those who frequently use Remote desktops. I've used RoyalTs and few other applications, but RDC manager is better than all.

Windows tools/applications I make use of

Just thought of listing few applications/tools that I'm making use of or impressed much. Suggestions/feedback most welcome.